Troubleshooting CTEK's professional chargers
Please choose the charger you want to troubleshoot below.
MXS 10CIC
TROUBLESHOOTING
The charger doesn’t turn ON when connected to mains
- Try a different outlet.
- Disconnect any extension cables and connect the charger directly to an outlet.
- For UK-plugs: Check the fuse and replace, if necessary (same size).
If the issue persists, it is likely the charger has developed a fault.
For warranty inquiries, please contact your retailer to initiate a replacement claim.
If there are further issues, contact us for further support.
The MODE button doesn’t work
- Connect the charger mains.
- Try pressing the button a bit firmer and repeat it a few times.
- If the issue persists, the button is most likely defective. However, please keep in mind that the charger will still work in the selected mode.
For warranty inquiries, please contact your retailer to initiate a replacement claim.
If there are further issues, please contact us for further support.
Charger is connected to a battery, but it’s stuck in power saving mode
- The power indicator flashes during energy saving mode = no battery is connected, or battery too discharged (less than 2V).
- Check that the clamps are connected properly to the recommended charging points.
- Check the quick connector by disconnecting it and make sure the pins look good. Connect again and confirm proper contact.
- If you have additional accessories, switch between them and compare results.
- If possible, try the charger on a different battery in good condition.
If the issue persists, it is likely the charger has developed a fault. For warranty inquiries, please contact your retailer to initiate a replacement claim.
If there are further issues, please contact us for support.
DISPLAY EXPLANATION
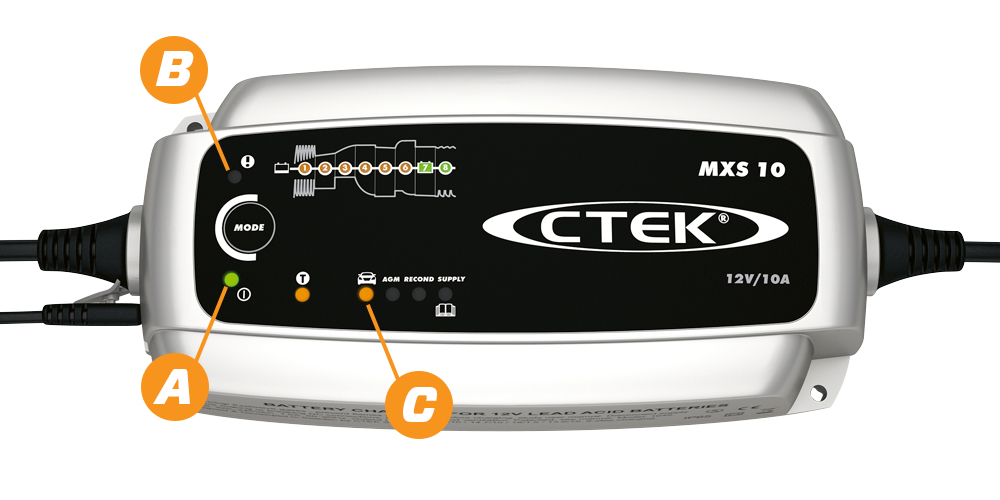
Power indicator( A ) is lit steadily. Indicates that the mains cable is connected to the wall socket.
The power indicator flashes during energy saving mode = no battery is connected.
Error Indicator ( B ). Indicates that the charger is incorrectly connected to the battery.
Charging indicator ( 1, 2, 3, 4, 5, 6, 7, 8 ). Indicates which stage the charger is on during the charging process.
Fully charged ( 7, 8 ).
Charging modes:
( C ) for lead-acid batteries up to 200Ah.
AGM for cold weather and charging AGM batteries. Higher charging voltage 14.7V.
RECOND for reconditioning of deeply discharged WET and Ca/Ca batteries. 15.8V.
SUPPLY can be used as power generator during, for example, battery change. 13.6V.
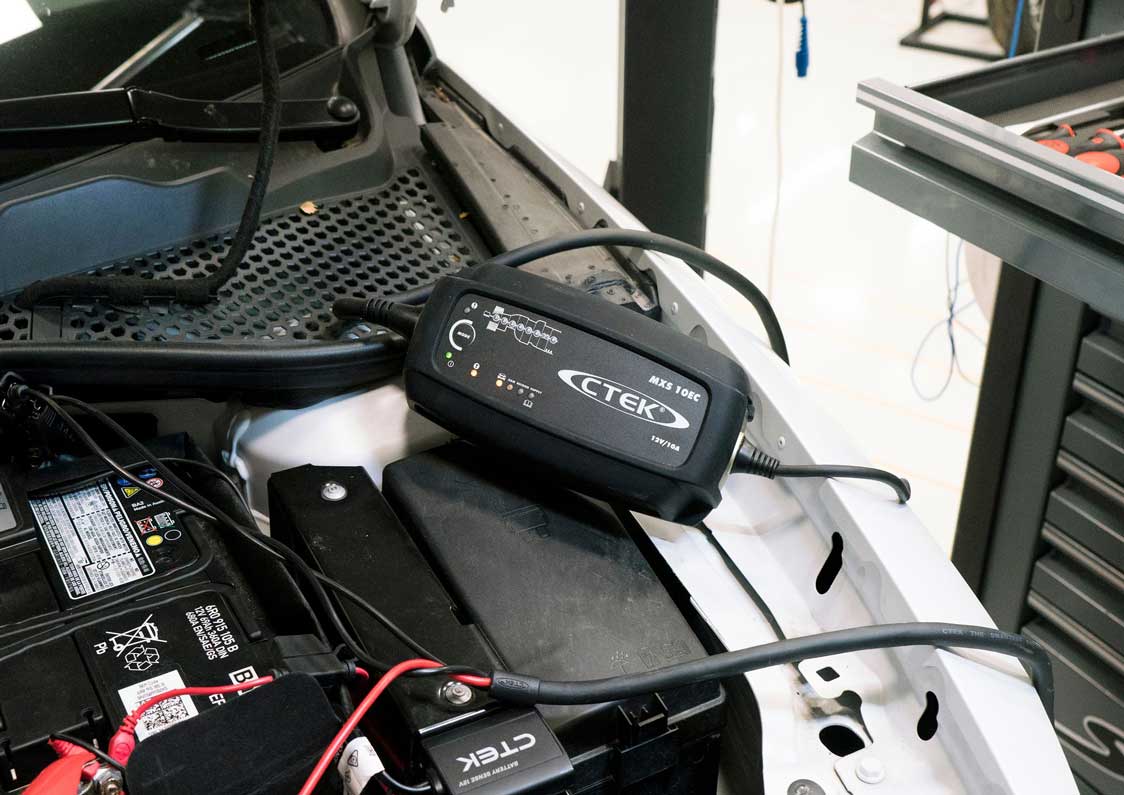
MXS 10EC
TROUBLESHOOTING
The charger doesn’t turn ON when connected to mains
- Try a different outlet.
- Disconnect any extension cables and connect the charger directly to an outlet.
- For UK-plugs: Check the fuse and replace, if necessary (same size).
If the issue persists, it is likely the charger has developed a fault.
For warranty inquiries, please contact your retailer to initiate a replacement claim.
If there are further issues, contact us for further support.
The MODE button doesn’t work
- Connect the charger mains.
- Try pressing the button a bit firmer and repeat it a few times.
- If the issue persists, the button is most likely defective. However, please keep in mind that the charger will still work in the selected mode.
For warranty inquiries, please contact your retailer to initiate a replacement claim.
If there are further issues, please contact us for support.
Charger is connected to a battery but it’s stuck in power saving mode.
- The power indicator flashes during energy saving mode = no battery is connected, or battery too discharged (less than 2V).
- Check that the clamps are connected properly to the recommended charging points.
- Check the quick connector by disconnecting it and make sure the pins look good. Connect again and confirm proper contact.
- If you have additional accessories, switch between them and compare results.
- If possible, try the charger on a different battery in good condition.
If the issue persists, it is likely the charger has developed a fault. For warranty inquiries, please contact your retailer to initiate a replacement claim.
If there are further issues, please contact us for further support.
DISPLAY EXPLANATION
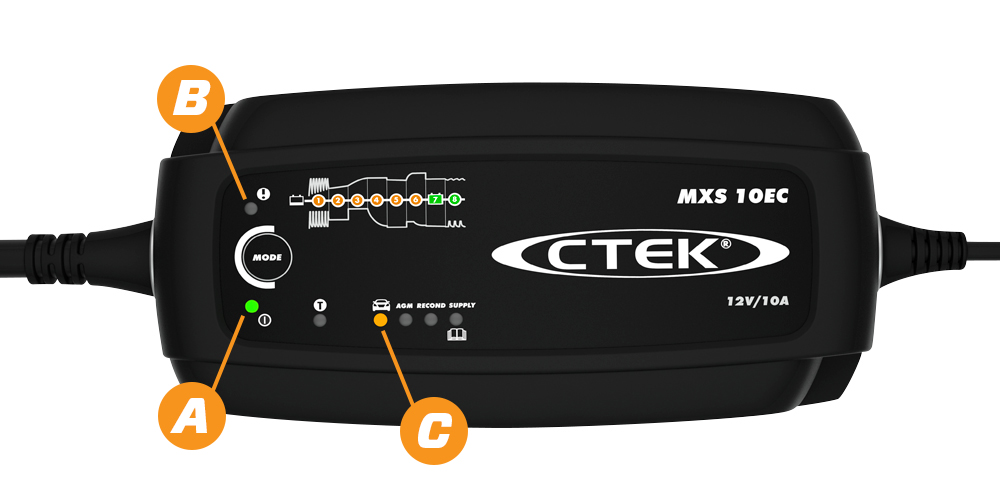
Power indicator ( A ) is lit steadily. Indicates that the mains cable is connected to the wall socket.
The power indicator flashes during energy saving mode = no battery is connected.
Error incicator ( B ). Indicates that the charger is incorrectly connected to the battery.
Charging indicator ( 1, 2, 3, 4, 5, 6, 7, 8 ). Indicates which stage the charger is on during the charging process.
Fully charged ( 7, 8 ).
Charging modes:
( C ) for lead-acid batteries up to 200Ah.
AGM for cold weather and charging AGM batteries. Higher charging voltage 14.7V.
RECOND for reconditioning of deeply discharged WET and Ca/Ca batteries. 15.8V.
SUPPLY can be used as power generator during, for example, battery change. 13.6V.
PRO15S
TROUBLESHOOTING
The charger doesn’t turn ON when connected to mains
- Try a different outlet.
- Disconnect any extension cables and connect the charger directly to an outlet.
- For UK-plugs: Check the fuse and replace, if necessary (same size).
If the issue persists, it is likely the charger has developed a fault.
For warranty inquiries, please contact your retailer to initiate a replacement claim.
If there are further issues, contact us for further support.
The MODE button doesn’t work
- Connect the charger mains.
- Try pressing the button a bit firmer and repeat it a few times.
- If the issue persists, the button is most likely defective. However, please keep in mind that the charger will still work in the selected mode.
For warranty inquiries, please contact your retailer to initiate a replacement claim.
If there are further issues, please contact us for support.
Charger is connected to a battery but it’s stuck in power saving mode.
- The power indicator flashes during energy saving mode = no battery is connected, or battery too discharged (less than 2V).
- Check that the clamps are connected properly to the recommended charging points.
- Check the quick connector by disconnecting it and make sure the pins look good. Connect again and confirm proper contact.
- If you have additional accessories, switch between them and compare results.
- If possible, try the charger on a different battery in good condition.
If the issue persists, it is likely the charger has developed a fault. For warranty inquiries, please contact your retailer to initiate a replacement claim.
If there are further issues, please contact us for further support.
DISPLAY EXPLANATION
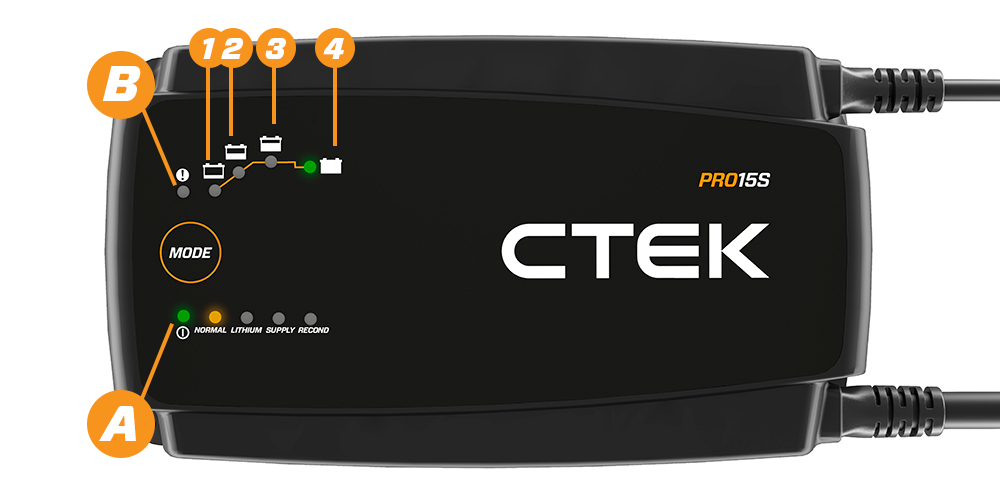
Power indicator ( A ) is lit steadily. Indicates that the mains cable is connected to the wall socket.
The power indicator flashes during energy saving mode = no battery is connected.
Error indicator ( B ). Indicates that the charger is incorrectly connected to the battery.
Charging indicator ( 1, 2, 3, 4 ). Indicates which stage the charger is at during the charging process
Fully charged ( 4 ).
Charging modes:
NORMAL for lead-acid batteries.
LITHIUM for lithium batteries.
SUPPLY can be used as power generator during, for example, battery change. 13.6V.
RECOND for reconditioning of deeply discharged WET and Ca/Ca batteries. 15.8V.
PRO25S
TROUBLESHOOTING
The charger doesn’t turn ON when connected to mains
- Try a different outlet.
- Disconnect any extension cables and connect the charger directly to an outlet.
- For UK-plugs: Check the fuse and replace, if necessary (same size).
If the issue persists, it is likely the charger has developed a fault.
For warranty inquiries, please contact your retailer to initiate a replacement claim.
If there are further issues, contact us for further support.
The MODE button doesn’t work
- Connect the charger mains.
- Try pressing the button a bit firmer and repeat it a few times.
- If the issue persists, the button is most likely defective. However, please keep in mind that the charger will still work in the selected mode.
For warranty inquiries, please contact your retailer to initiate a replacement claim.
If there are further issues, please contact us for support.
Charger is connected to a battery but it’s stuck in power saving mode.
- The power indicator flashes during energy saving mode = no battery is connected, or battery too discharged (less than 2V).
- Check that the clamps are connected properly to the recommended charging points.
- Check the quick connector by disconnecting it and make sure the pins look good. Connect again and confirm proper contact.
- If you have additional accessories, switch between them and compare results.
- If possible, try the charger on a different battery in good condition.
If the issue persists, it is likely the charger has developed a fault. For warranty inquiries, please contact your retailer to initiate a replacement claim.
If there are further issues, please contact us for further support.
DISPLAY EXPLANATION
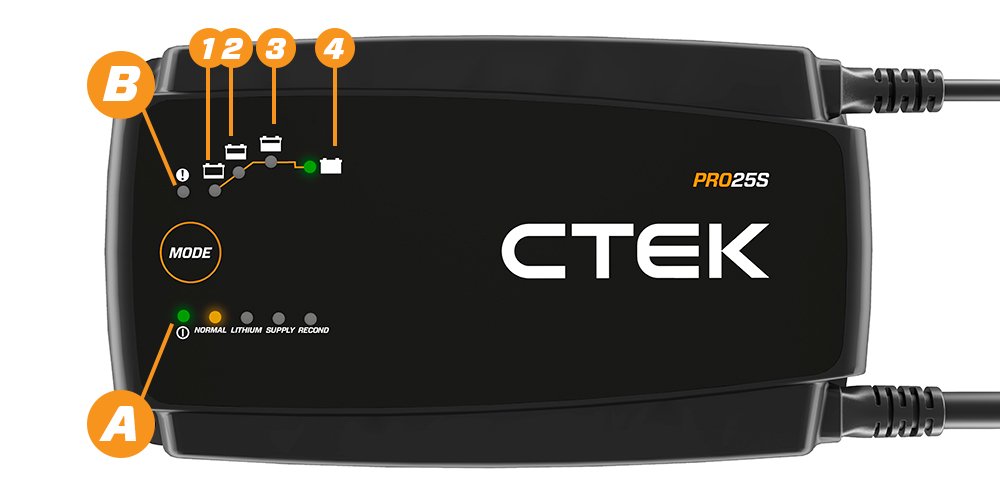
Power indicator ( A ) is lit steadily. Indicates that the mains cable is connected to the wall socket.
The power indicator flashes during energy saving mode = no battery is connected.
Error indicator ( B ). Indicates that the charger is incorrectly connected to the battery.
Charging indicator ( 1, 2, 3, 4 ). Indicates which stage the charger is at during the charging process
Fully charged ( 4 ).
Charging modes:
NORMAL for lead-acid batteries.
LITHIUM for lithium batteries.
SUPPLY can be used as power generator during, for example, battery change. 13.6V.
RECOND for reconditioning of deeply discharged WET and Ca/Ca batteries. 15.8V.
PRO25SE
TROUBLESHOOTING
The charger doesn’t turn ON when connected to mains
- Try a different outlet.
- Disconnect any extension cables and connect the charger directly to an outlet.
- For UK-plugs: Check the fuse and replace, if necessary (same size).
If the issue persists, it is likely the charger has developed a fault.
For warranty inquiries, please contact your retailer to initiate a replacement claim.
If there are further issues, contact us for further support.
The MODE button doesn’t work
- Connect the charger mains.
- Try pressing the button a bit firmer and repeat it a few times.
- If the issue persists, the button is most likely defective. However, please keep in mind that the charger will still work in the selected mode.
For warranty inquiries, please contact your retailer to initiate a replacement claim.
If there are further issues, please contact us for support.
Charger is connected to a battery but it’s stuck in power saving mode.
- The power indicator flashes during energy saving mode = no battery is connected, or battery too discharged (less than 2V).
- Check that the clamps are connected properly to the recommended charging points.
- Check the quick connector by disconnecting it and make sure the pins look good. Connect again and confirm proper contact.
- If you have additional accessories, switch between them and compare results.
- If possible, try the charger on a different battery in good condition.
If the issue persists, it is likely the charger has developed a fault. For warranty inquiries, please contact your retailer to initiate a replacement claim.
If there are further issues, please contact us for further support.
DISPLAY EXPLANATION
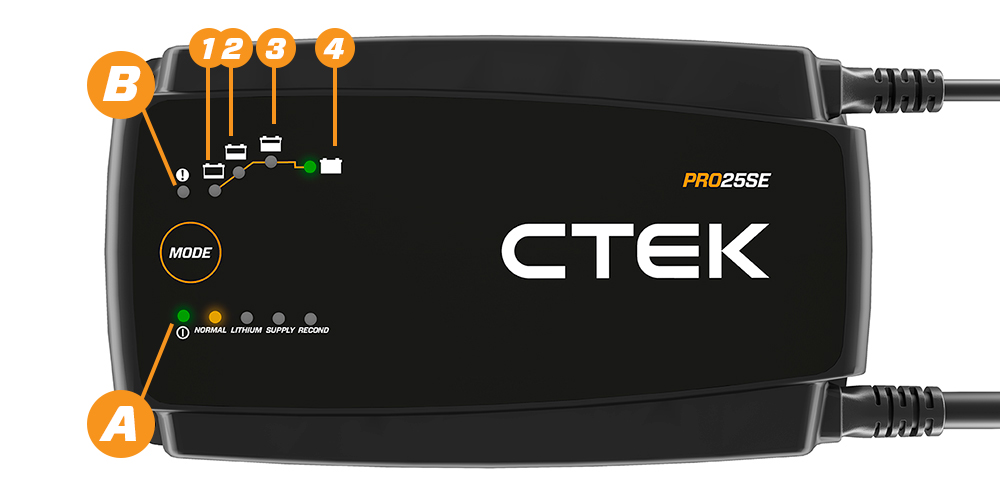
Power indicator ( A ) is lit steadily. Indicates that the mains cable is connected to the wall socket.
The power indicator flashes during energy saving mode = no battery is connected.
Error indicator ( B ). Indicates that the charger is incorrectly connected to the battery.
Charging indicator ( 1, 2, 3, 4 ). Indicates which stage the charger is at during the charging process
Fully charged ( 4 ).
Charging modes:
NORMAL for lead-acid batteries.
LITHIUM for lithium batteries.
SUPPLY can be used as power generator during, for example, battery change. 13.6V.
RECOND for reconditioning of deeply discharged WET and Ca/Ca batteries. 15.8V.
MXTS40
TROUBLESHOOTING
The charger doesn’t turn ON when connected to mains
- Try a different outlet.
- Disconnect any extension cables and connect the charger directly to an outlet.
- For UK-plugs: Check the fuse and replace, if necessary (same size).
If the issue persists, it is likely the charger has developed a fault.
For warranty inquiries, please contact your retailer to initiate a replacement claim.
If there are further issues, contact us for further support.
Charger is displaying Error E09 upon start of the charger.
If E09 is set immediately upon start of the charger, it has failed its internal health check. This will result in the buttons being locked, and you cannot proceed.
- If this is the case, it is likely the charger has developed a fault.
For warranty inquiries or possible repair, please contact your retailer to initiate a replacement claim.
If there are further issues, please contact us for support.
Charger is displaying Error E09 while charging.
During charging, the internal voltage supply to the clamps is continuously being monitored. If a deviation from the expected voltage is detected, several restart attempts are made by the electronics. If the maximum number of start attempts in a series is reached, error code E09 is set.
Cause 1: One cause may be a heavy load, and the charger has difficulty starting.
Action 1: Try charging for a few minutes in supply mode and then switch to charge mode.
Cause 2: A dynamic load that switches and thus disturbs the charger.
Action 2: Remove the interference if possible.
If the issue persists, it is likely the charger has developed a fault. For warranty inquiries or possible repair, please contact your retailer to initiate a replacement or repair claim.
If there are further issues, please contact us for support.
DISPLAY EXPLANATION
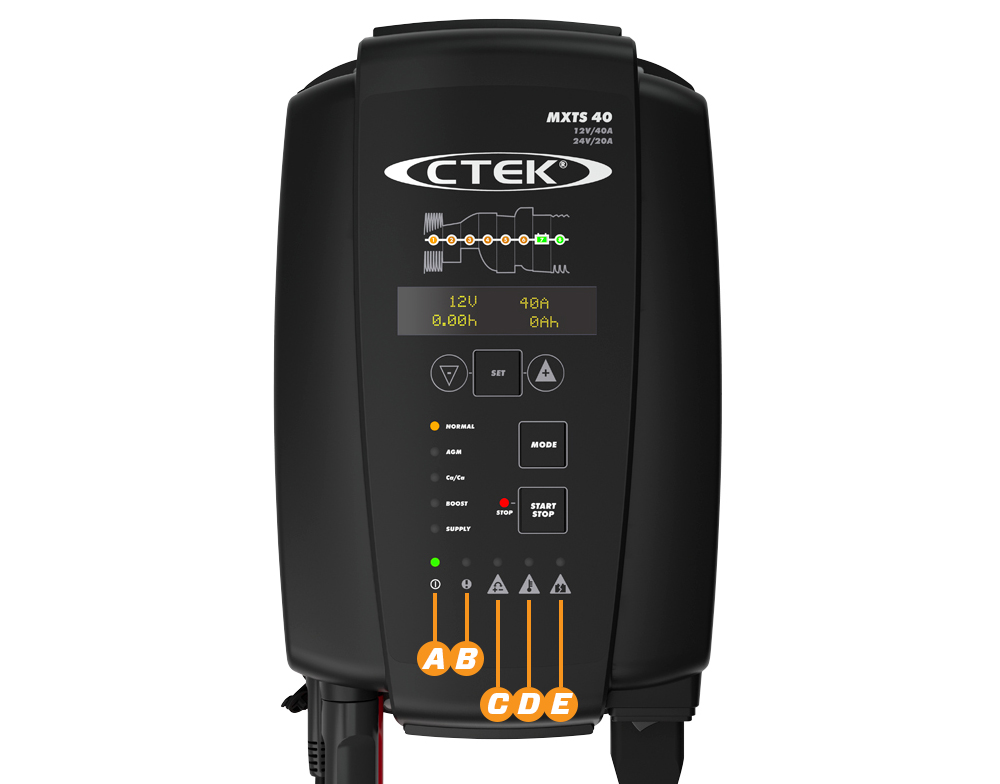
Power indicator ( A ) indicates that the power is connected and switched on.
General error indicator ( B ) indicates that an error has been detected.
Polarity error indicator ( C ) indicates reverse polarity or short circuit in charge cables error.
Battery error indicator ( D ) indicates battery temperature error. The battery is too hot to charge.
Battery voltage error indicator ( E ) indicates overvoltage error on battery connection.
BEFORE START
Display (V) indicates voltage set.
12/24 Volts. In supply, 12V setting (13.6/14.0/14.4/14.8V)
24V setting (27.2/28.0/28.8/29.6V).
Display (A) indicates current set.
12V setting (40/30/20/10A)
24V setting (20/15/10/5A)
Display (h) indicatoes which parameter to set (V/SV/A/T/RT[h]):
V = Nominal voltage
SV = Supply voltage
T = Temperature compensation
RT[h] = Recond time in BOOST program
Display (h) + (Ah & info) displays error codes:
A = Current limit
REAL TIME INDICATION DURING CHARGING
Display (V) displays output voltage.
Display (A) displays output current.
Display (h) displays..:
Alt. 1. ...total elapsed charging time (minutes/hours)
Alt. 2. ...time elapsed until error occurred
Alt. 3. ...error message
Display (h) + (Ah & info) displays..:
Alt. 1. ...total charge delivered since start (minutes/hours)
Alt. 2. ...error codes together with ERROR lamp
ERROR CODES
E01 | REVERSE POLARITY. Connect the charger according to “quick guide”.
E02 | OVER VOLTAGE. Battery voltage too high for the chosen charging program, check battery voltage.
E03 | TIME OUT STEP 1: DESULPHATION. Restart the charger. If charging is still being interrupted the battery is seriously sulphated and may need to be replaced.
E04 | TIME OUT STEP 2: SOFT START. Restart the charger. If charging is still being interrupted the battery cannot accept charge and may need to be replaced.
E05 | STEP 5: ANALYZE. Restart the charger. If charging is still being interrupted the battery cannot retain charge and may need to be replaced.
E06 | BATTERY OVERHEATED. The battery is too hot to charge. The battery is damaged and may need to be replaced.
E07 | LOW BATTERY VOLTAGE IN SUPPLY PROGRAM. Battery voltage too low or the connected consumers are too large. Check if 12V battery connected in 24V battery setting or disconnect large consumers.
E08 | HIGH CURRENT IN SUPPLY PROGRAM. Check if clamps are short circuited or connected to the wrong polarity.
E99 | OVER VOLTAGE PROTECTION. If battery voltage is below 17V the ERROR indicator is lit when 24V setting has been selected.
Alt. 1. Press START/STOP button to charge with 12V setting. To set the parameters for customized charging proceed with “CHARGING” step 6 to 9.
Alt. 2. Press INCREASE button to change to 24V setting. Press START/STOP button to resume. To set the parameters for customized charging proceed with “CHARGING” step 6 to 9.
PRO60
TROUBLESHOOTING
The charger doesn’t turn ON when connected to mains
- Try a different outlet.
- Disconnect any extension cables and connect the charger directly to an outlet.
- For UK-plugs: Check the fuse and replace, if necessary (same size).
If the issue persists, it is likely the charger has developed a fault.
For warranty inquiries, please contact your retailer to initiate a replacement claim.
If there are further issues, contact us for further support.
"INTERNAL ERROR 72"
- Please unplug the device from mains, Wait one minute and then replug the device.
f the issue persists, it is likely the charger has developed a fault. For warranty inquiries or possible repair, please contact your retailer to initiate a replacement or repair claim.
If there are further issues, please contact us for support.
"INTERNAL ERROR 74"
- Please unplug the device from mains, Wait one minute and then replug the device.
If the issue persists, it is likely the charger has developed a fault.
For warranty inquiries or possible repair, please contact your retailer to initiate a replacement or repair claim.
If there are further issues, please contact us for support.
DISPLAY EXPLANATION
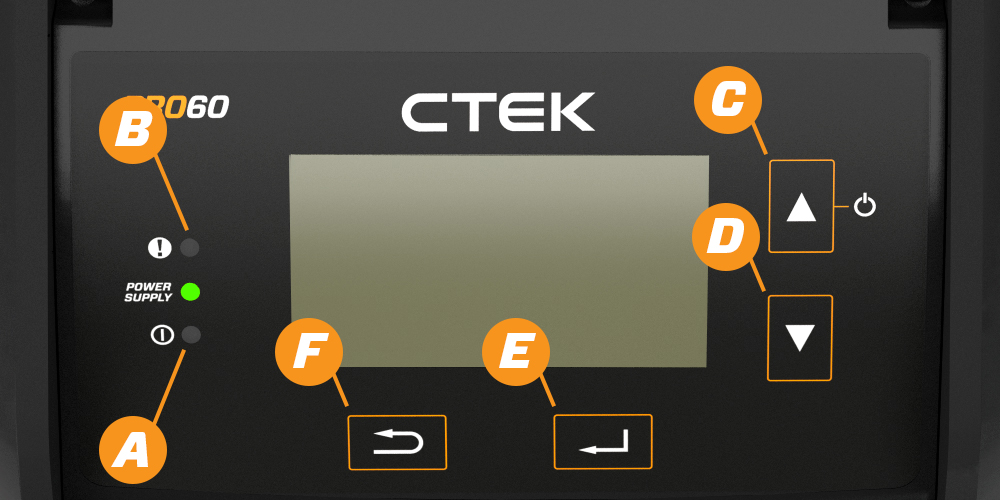
Power indocator ( A) indicates that power is connected switched on.
Power Supply (POWER SUPPLY) lights yellow when power supply mode is active.
Error indicator ( B ) lights red to indicate error (see errors and display).
( C ) ON/OFF-button. Press 3 seconds to start or interrupt charging. Press to scroll up in menu and to increase values.
( D ) Press to scroll down in menu or decrease values.
( E ) Press to activate selected program or setting.
( F ) Press to step back or stop in menu.
ERRORS
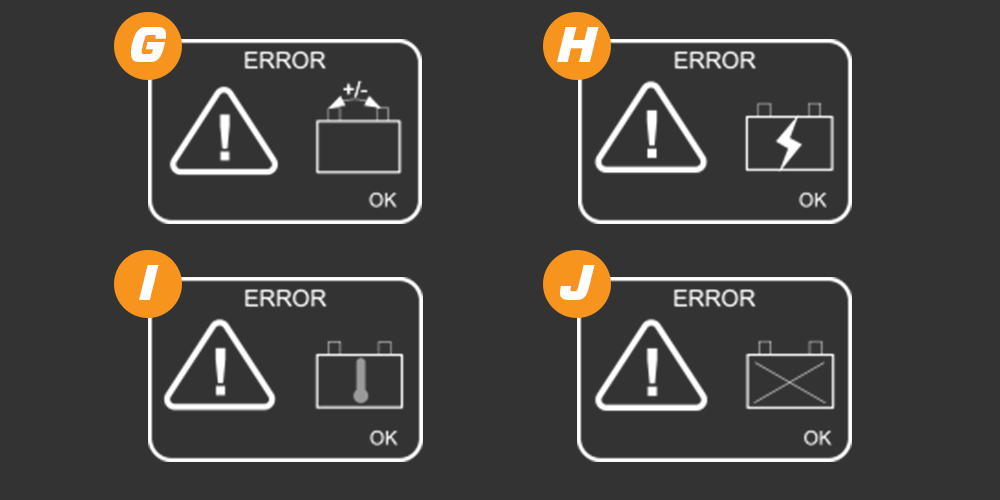
Error indicator ( B ) lights red to indicate error:
WRONG POLARITY ( G )
Reversed polarity or short circuit in charge cables error.
ACTION: Connect the charger according to “how to operate”.
OVERVOLTAGE ( H )
The charger is connected to a 24V battery.
ACTION: Connect the charger to a 12V battery.
OVERTEMPERATURE ( I )
The battery is too hot to charge.
ACTION: Let the battery cool down or the battery is damaged and may need to be replaced.
BROKEN BATTERY ( J )
ACTION: Check connections and settings, and retry charging, before replacing the battery.
PRO120
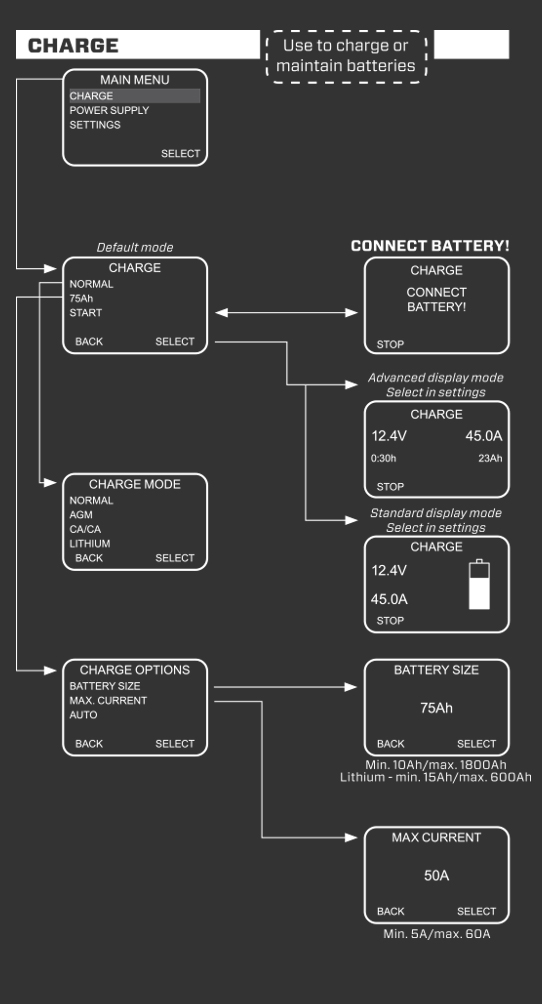
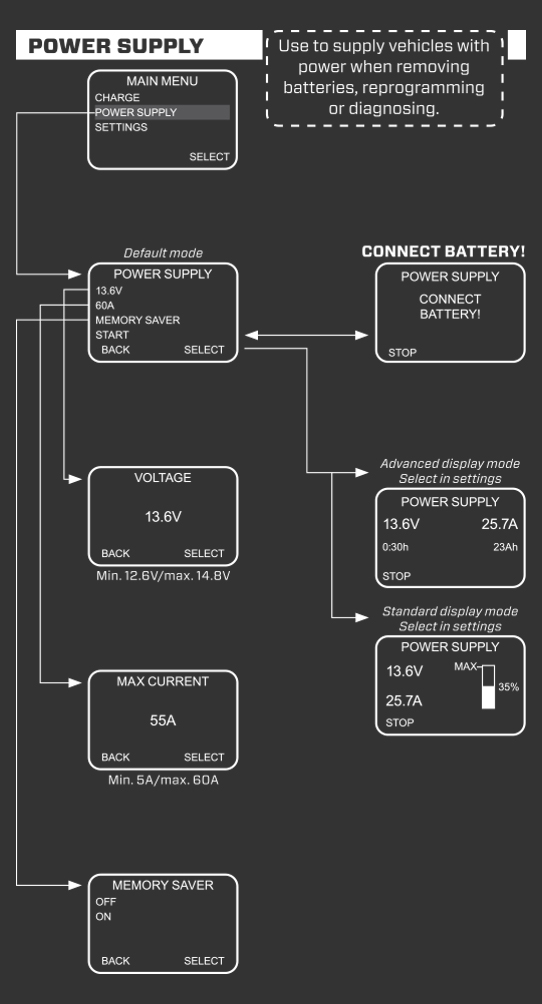
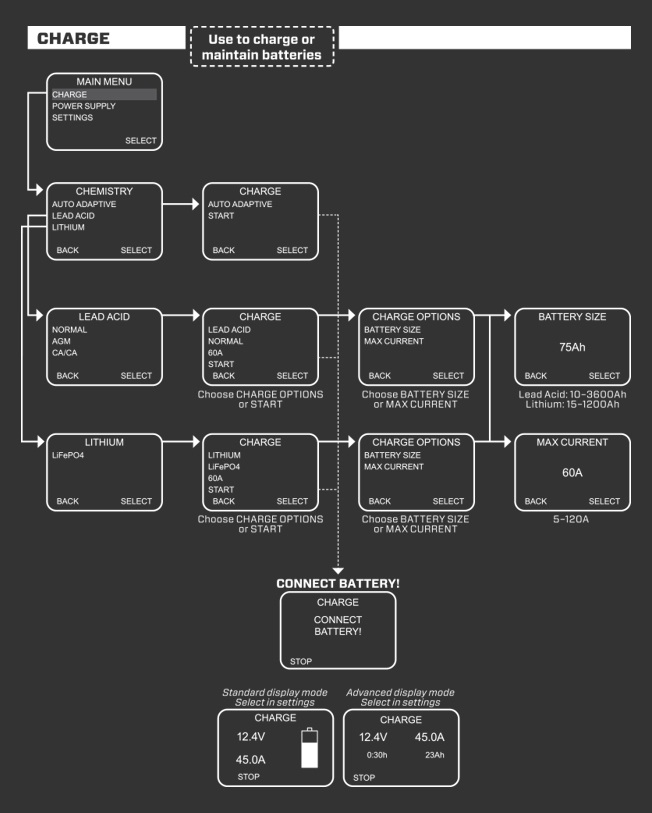
Click on the images above to enlarge (still not readable after clicking the image? Use the zoom tool on your browser)
TROUBLESHOOTING
The charger doesn’t turn ON when connected to mains
- Try a different outlet.
- Disconnect any extension cables and connect the charger directly to an outlet.
- For UK-plugs: Check the fuse and replace, if necessary (same size).
If the issue persists, it is likely the charger has developed a fault.
For warranty inquiries, please contact your retailer to initiate a replacement claim.
If there are further issues, contact us for further support.
"INTERNAL ERROR 72"
- Please unplug the device from mains, Wait one minute and then replug the device.
If the issue persists, it is likely the charger has developed a fault. For warranty inquiries or possible repair, please contact your retailer to initiate a replacement or repair claim.
If there are further issues, please contact us for support.
"INTERNAL ERROR 74"
- Please unplug the device from mains, Wait one minute and then replug the device.
If the issue persists, it is likely the charger has developed a fault.
For warranty inquiries or possible repair, please contact your retailer to initiate a replacement or repair claim.
If there are further issues, please contact us for support.
DISPLAY EXPLANATION
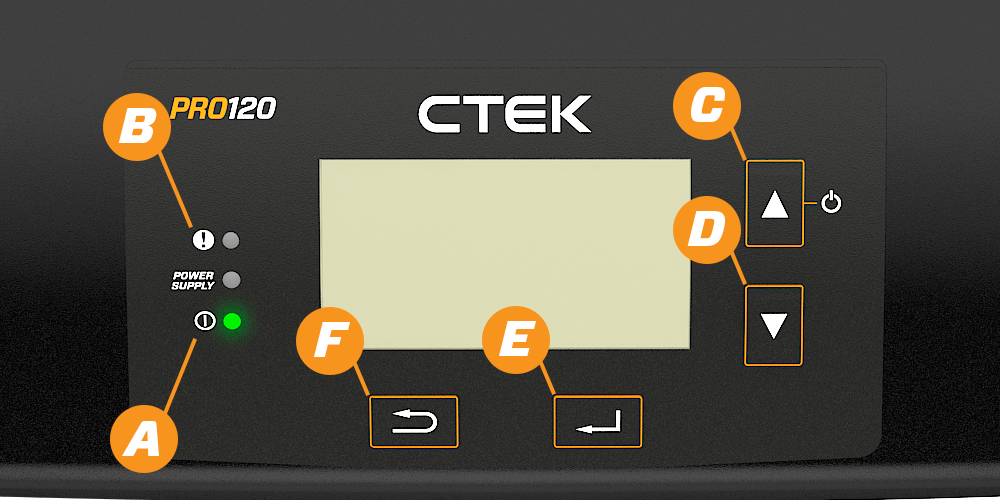
Power indocator ( A) indicates that power is connected switched on.
Power Supply (POWER SUPPLY) lights yellow when power supply mode is active.
Error indicator ( B ) lights red to indicate error (see errors and display).
( C ) ON/OFF-button. Press 3 seconds to start or interrupt charging. Press to scroll up in menu and to increase values.
( D ) Press to scroll down in menu or decrease values.
( E ) Press to activate selected program or setting.
( F ) Press to step back or stop in menu.
ERRORS
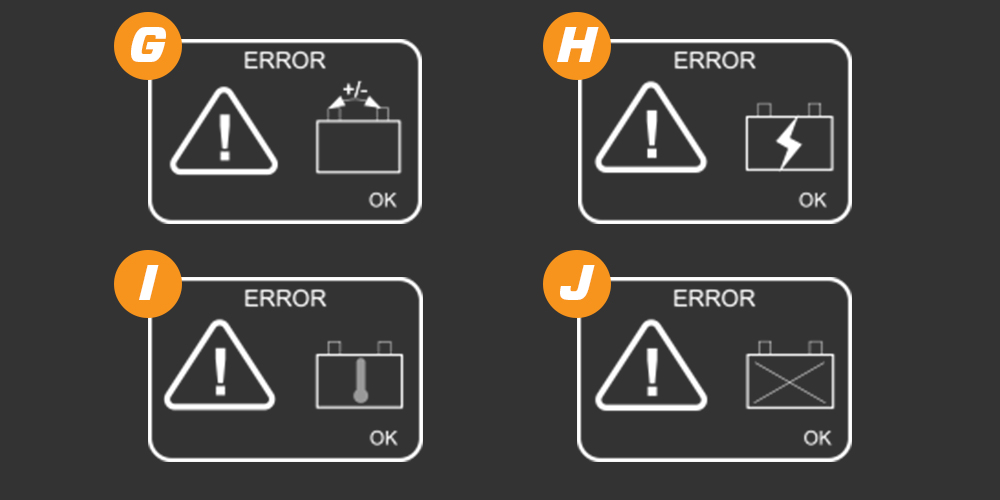
Error indicator ( B ) lights red to indicate error:
WRONG POLARITY ( G )
Reversed polarity or short circuit in charge cables error.
ACTION: Connect the charger according to “how to operate”.
OVERVOLTAGE ( H )
The charger is connected to a 24V battery.
ACTION: Connect the charger to a 12V battery.
OVERTEMPERATURE ( I )
The battery is too hot to charge.
ACTION: Let the battery cool down or the battery is damaged and may need to be replaced.
BROKEN BATTERY ( J )
ACTION: Check connections and settings, and retry charging, before replacing the battery.
MXT 4.0
TROUBLESHOOTING
The charger doesn’t turn ON when connected to mains.
- Try a different outlet.
- Disconnect any extension cables and connect the charger directly to an outlet.
- For UK-plugs: Check the fuse and replace, if necessary (same size).
If the issue persists, it is likely the charger has developed a fault.
For warranty inquiries, please contact your retailer to initiate a replacement claim.
If there are further issues, contact us for further support.
The MODE button doesn't work
- Please unplug the device from mains, Wait one minute and then replug the device.
If the issue persists, it is likely the charger has developed a fault. However, please keep in mind that the charger will still work in the selected mode.
For warranty inquiries or possible repair, please contact your retailer to initiate a replacement or repair claim.
If there are further issues, please contact us for support.
Charger is connected to a battery but it’s stuck in power saving mode.
- The power indicator flashes during energy saving mode = no battery is connected, or battery too discharged (less than 2V).
- Check that the clamps are connected properly to the recommended charging points.
- Check the charging cables for imperfections or indentations.
- If possible, try the charger on a different battery in good condition.
If the issue persists, it is likely the charger has developed a fault.
For warranty inquiries or possible repair, please contact your retailer to initiate a replacement or repair claim.
If there are further issues, please contact us for support.
DISPLAY EXPLANATION
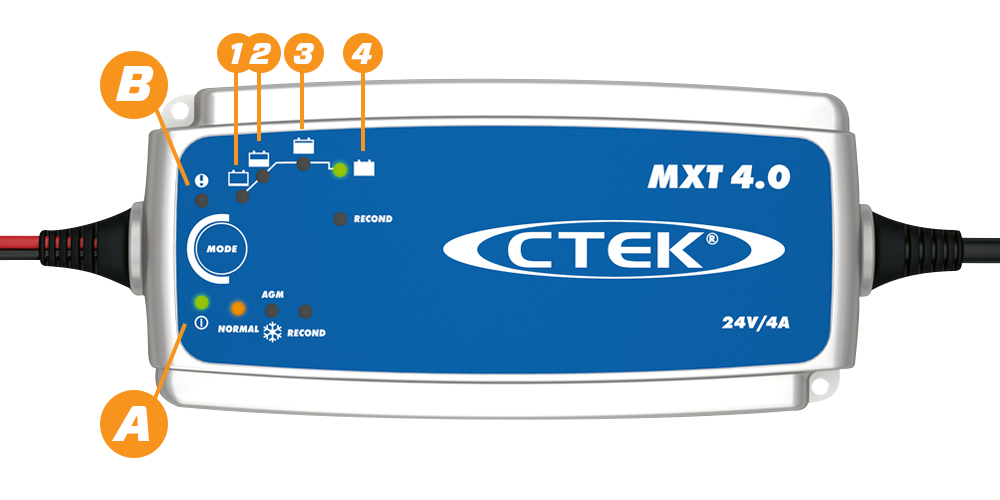
Power indicator ( A ) is lit steadily. Indicates that the mains cable is connected to the wall socket.
The power indicator flashes during energy saving mode = no battery is connected.
Error indicator ( B ). Indicates that the charger is incorrectly connected to the battery.
Charging indicator (1, 2, 3, 4, RECOND). Indicates the stage the charger is on during the charging process.
Fully charged ( 4 ).
Charging modes:
NORMAL for lead-acid batteries.
AGM for charging in cold and of AGM batteries. Higher charging voltage. 29.4V.
RECOND for reconditioning of deeply discharged WET and Ca/Ca batteries. 31.6V.
MXT 14
TROUBLESHOOTING
The charger doesn’t turn ON when connected to mains.
- Try a different outlet.
- Disconnect any extension cables and connect the charger directly to an outlet.
- For UK-plugs: Check the fuse and replace, if necessary (same size).
If the issue persists, it is likely the charger has developed a fault.
For warranty inquiries, please contact your retailer to initiate a replacement claim.
If there are further issues, contact us for further support.
The MODE button doesn't work
- Please unplug the device from mains, Wait one minute and then replug the device.
If the issue persists, it is likely the charger has developed a fault. However, please keep in mind that the charger will still work in the selected mode.
For warranty inquiries or possible repair, please contact your retailer to initiate a replacement or repair claim.
If there are further issues, please contact us for support.
Charger is connected to a battery but it’s stuck in power saving mode.
- The power indicator flashes during energy saving mode = no battery is connected, or battery too discharged (less than 2V).
- Check that the clamps are connected properly to the recommended charging points.
- Check the charging cables for imperfections or indentations.
- If possible, try the charger on a different battery in good condition.
If the issue persists, it is likely the charger has developed a fault.
For warranty inquiries or possible repair, please contact your retailer to initiate a replacement or repair claim.
If there are further issues, please contact us for support.
DISPLAY EXPLANATION
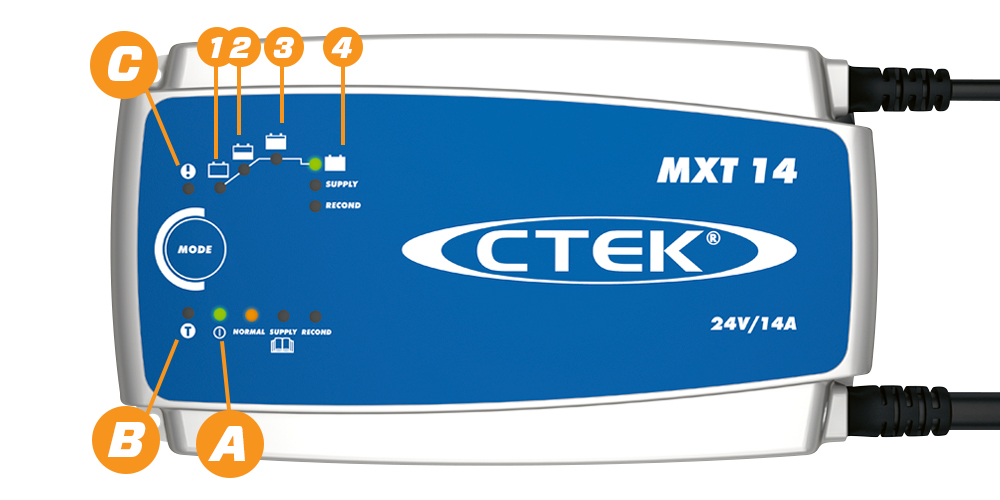
Power indicator ( A ) is lit steadily. Indicates that the mains cable is connected to the wall socket.
The power indicator flashes during energy saving mode = no battery is connected.
Temperature indicator ( B ). Optimizes charging regardless of the weather conditions: Lit = Activated, Unlit = Not activated/ defective cable.
Error indicaor ( C ). Indicates that the charger is incorrectly connected to the battery.
Charging indicator ( 1, 2, 3, 4, SUPPLY, RECOND). Indicates the stage the charger is on during the charging process.
Fully charged ( 4 ).
Charging modes:
NORMAL for lead-acid batteries.
SUPPLY can be used as a power generator during, for example, battery change. 27.2V.
RECOND for reconditioning of deeply discharged WET and Ca/Ca batteries. 31.6V.

